Group
The third layer in the admin environment is the 'Group' layer.
Here you create a group within a specific location where users can login and use the app.
Also within this layer you can customize the content to create a personalized experience for every group, by default a newly created group gets the current state of content of the location for which it is created.
Usage of the application takes place inside this layer.
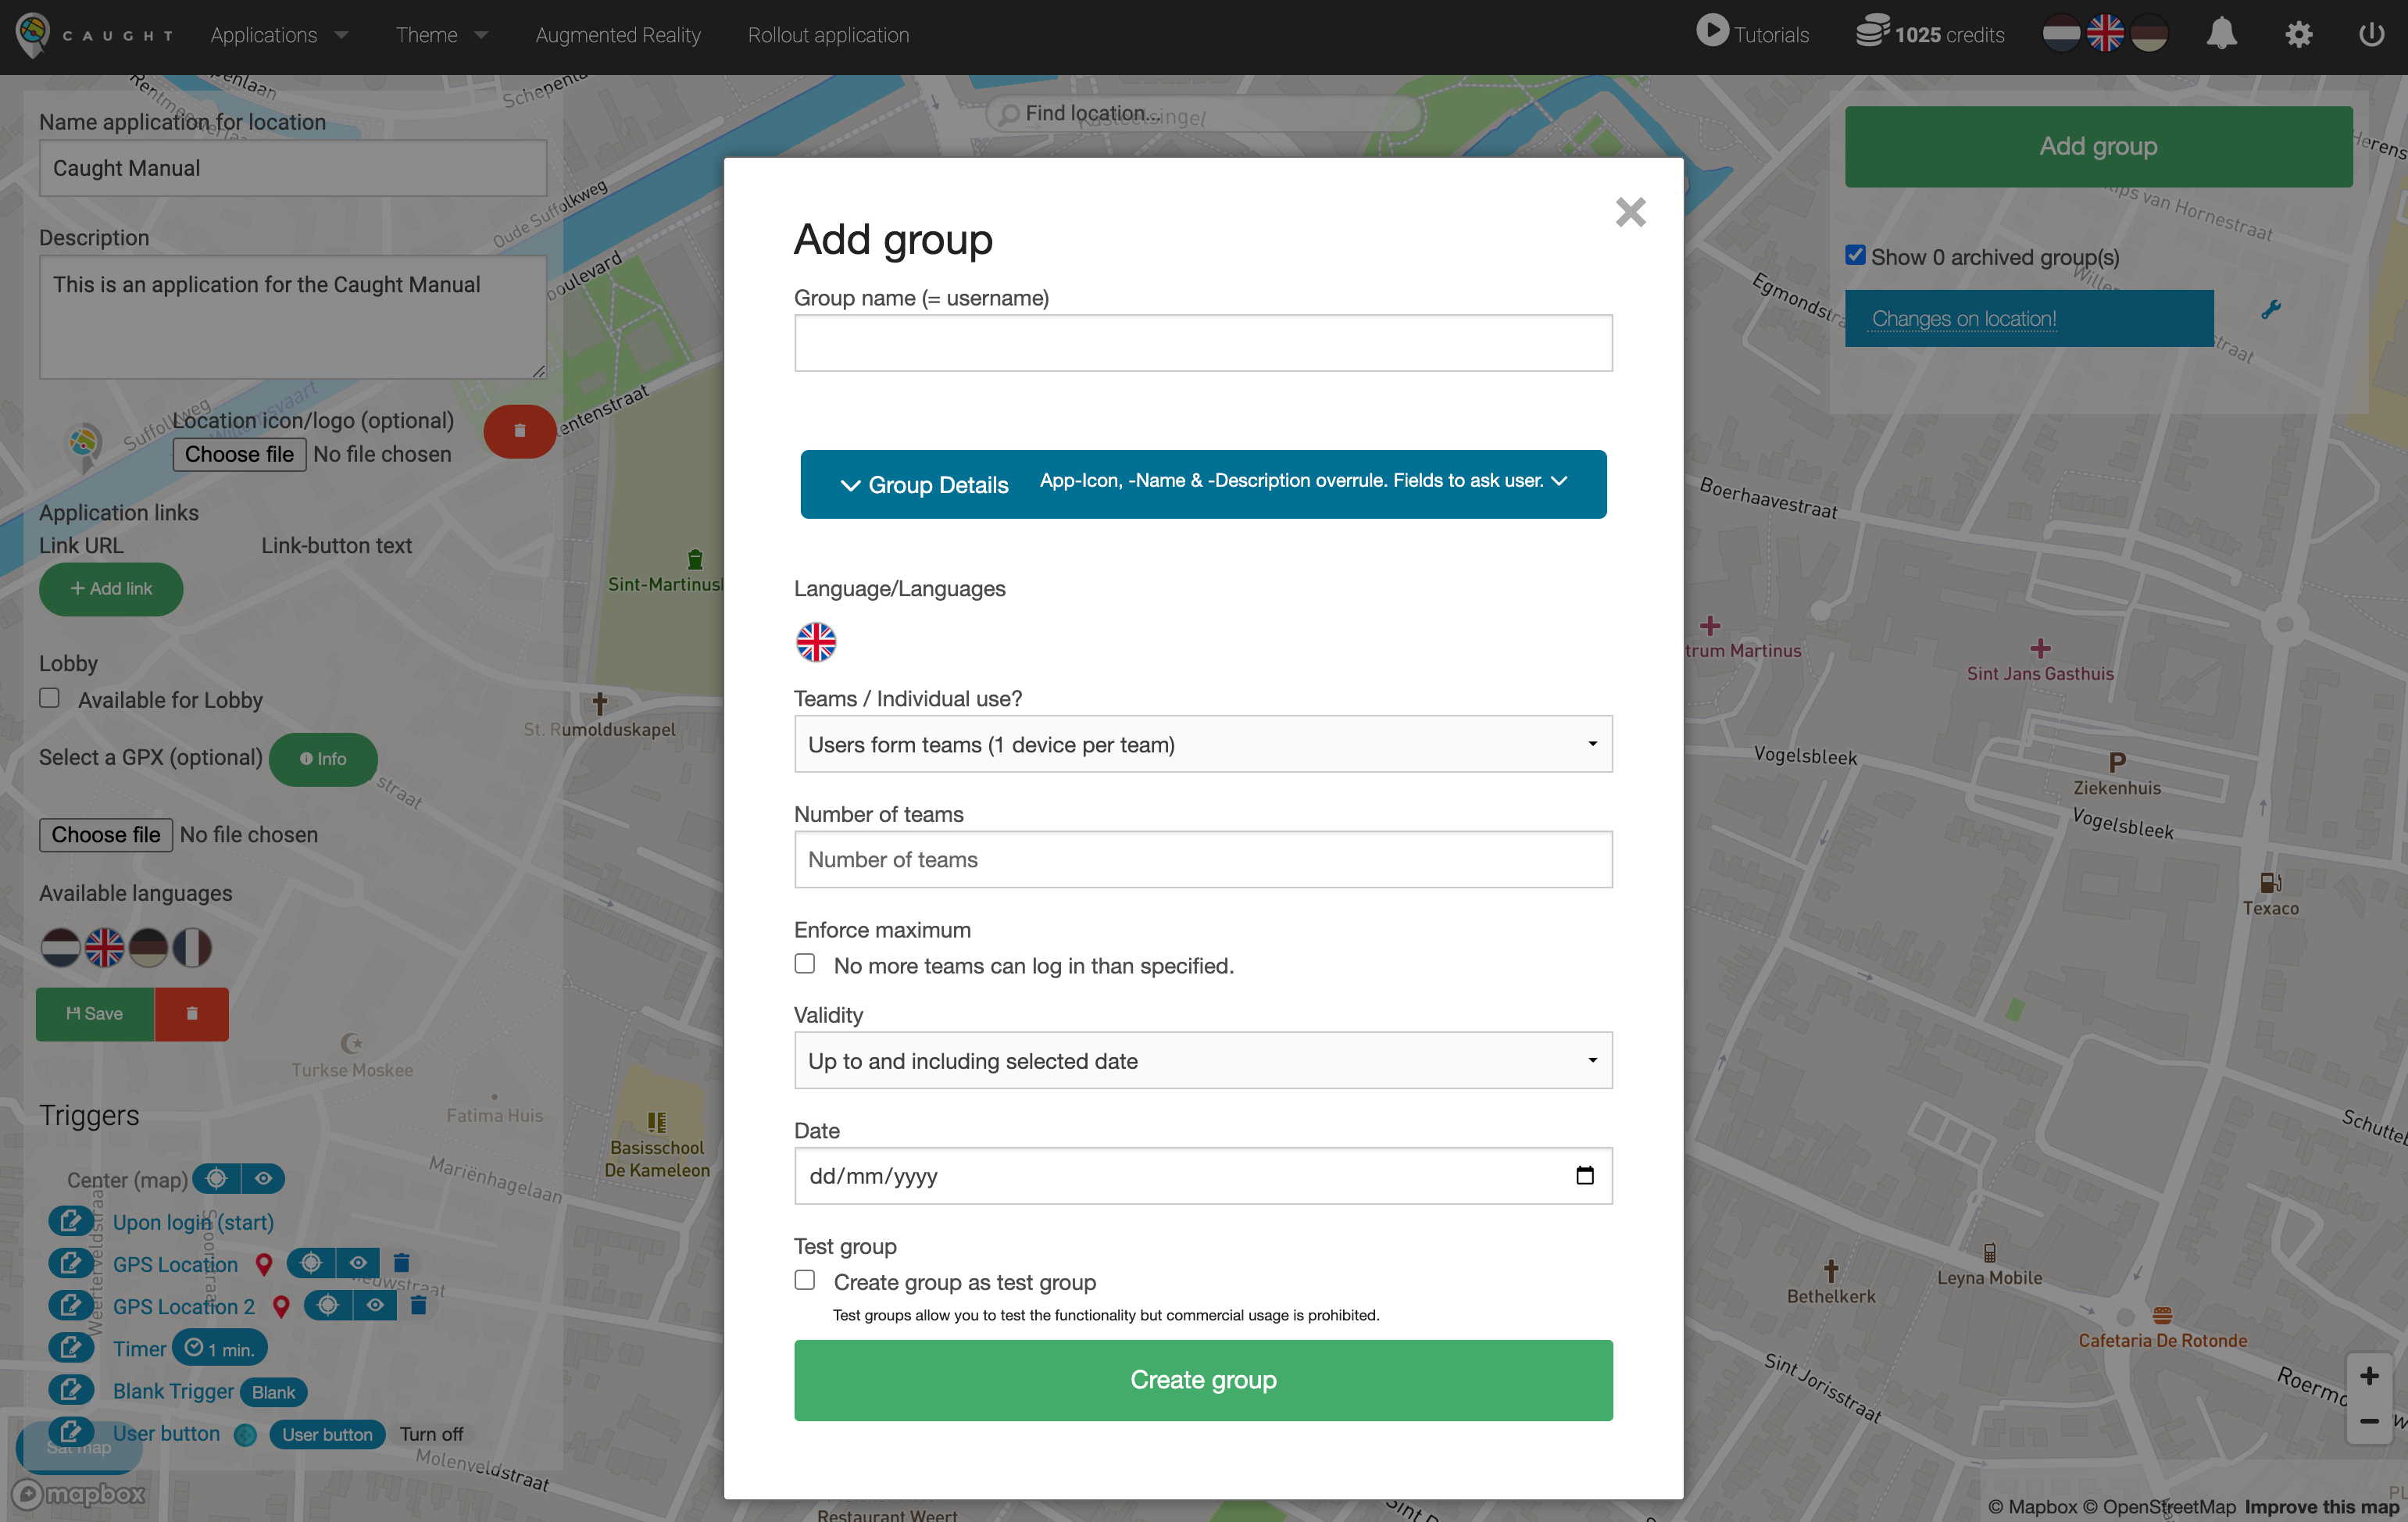
Within the layer 'location' (edit a location screen) click on 'Add group' to create a group.

Details:
When creating a group you'll need to enter the following details:
-
"Group name"; the name for the group.
- This is also the username of the group when logging in.
\
-
"Group Details";
- "Group icon/logo"; upload an icon/logo (optional).
 The icon/logo of the application can be different for every location and will be displayed to the user in the top bar.
- "Name application for this group"; the name of the application for this specific group.
- The name of the application can be different for every group.
- "Description for this group"; a general description of the app.
- The description can be different for every group.
- "Fields to ask users"; select the fields to ask users upon login.
- "E-mail"
- "Phonenumber"
- if asked - the e-mail/phonenumber will be visible for the host.
- "Select a GPX"; upload a GPX file (optional).
- "Billing tag"; select the desired option (if applicable)
\
- "Group icon/logo"; upload an icon/logo (optional).
-
"Language/Languages"; select the desired language(s) for the user to choose from.
- Users will be able to select a preferred language upon login, or at any later point via the settings in the app.
-
"Teams / Individual use?"; select the preferred option.
- "Users form teams (1 device per team)"; teams with one main device.
- Users have to choose a team name and enter a PIN code of their own choosing.
- "Users use individually (1 device per user)"; single users with one main device.
- Users have to enter the first- and last name and enter a PIN code of their own choosing.
- "Main / support (multiple devices per team)"; teams with one main device and the possibility to add one or multiple support devices.
- Main device; the only device that triggers GPS locations and can complete assignments.
- Support device(s); a duplicate of the main device, but users can navigate through the app on their own.
-
Users have to choose a team name and enter a PIN code of their own choosing.
-
- "Users form teams (1 device per team)"; teams with one main device.
The PIN code always serves as a safeguard to keep others from entering another team/user unwanted since all participants log in using the same username and password.
- "Number of teams"; enter the number of teams that will use the application simultaneously for this group.
- "Enforce maximum"; if checked - no more teams can log in than specified at "number of teams".
- "Validity"; select the preferred option.
-
"Up to and including selected date"; a group is available for users and hosts up to and including the selected date (after this date, the group is no longer available).
-
"One time only, up to and including selected date"; a group is only available once for users and hosts up to and including the selected date (after this date, the group is no longer available). The group will expire a day after the first team is created.
-
When creating a team, a warning will be shown to the user, telling that the group will expire the next day.
Within the admin environment you can still access the groups (e.g. downloading pictures/videos).
- "Date"; select a date of validity.
- "Test group"; if checked - the group will be created as test group.
-
Test groups allow you to test the functionality without being charged (commercial usage is prohibited), therefor the server will not be scaled to support usage with multiple users as test groups simultaneously.
-
The user icon in a test group can be moved on the map by clicking on it and dragging it to simulate movement.
Then click "Create group". Now the group for this location is made.


Click on the group to open the 'Edit group" screen, where the group information is shown and where the group can be edited.
Quick-access code; users can log in the app using the username and quick-access code (password).
QR-code; instead of using the username and password, the user can scan the QR-code with app to automatically log in the app.
Details:
When a group is created you'll get the following details:
- "Group Details";
- "Host Quick-access code"; hosts can directly log in the host environment using the quick-access code.
- "Username"; the name of the group.
- "Password"; the password is automatically generated and will serve as the login password for users to log in.
- "Group icon/logo"; upload an icon/logo (optional).
- The icon/logo of the application can be different for every location and will be displayed to the user in the top bar.
- "Name application for this group"; the name of the application for this specific group.
- The name of the application can be different for every group.
- "Description for this group"; a general description of the app.
- The description can be different for every group.
- "Fields to ask users"; select the fields to ask users upon login.
- "E-mail"
- "Phonenumber"
- if asked - the e-mail/phonenumber will be visible for the host.
- "Select a GPX"; upload a GPX file (optional).
- "Language/Languages"; select the desired language(s) for the user to choose from.
- Users will be able to select a preferred language upon login, or at any later point via the settings in the app.
- "Teams / Individual use?"; select the preferred option.
- "Users form teams (1 device per team)"; teams with one main device.
- Users have to choose a team name and enter a PIN code of their own choosing.
- "Users use individually (1 device per user)"; single users with one main device.
- Users have to enter the first- and last name and enter a PIN code of their own choosing.
- "Main / support (multiple devices per team)"; teams with one main device and the possibility to add one or multiple support devices.
- Main device; the only device that triggers GPS locations and can complete assignments.
- Support device(s); a duplicate of the main device, but users can navigate through the app on their own.
-
Users have to choose a team name and enter a PIN code of their own choosing.
-
- "Users form teams (1 device per team)"; teams with one main device.
The PIN code always serves as a safeguard to keep others from entering another team/user unwanted since all participants log in using the same username and password.
- "Number of teams"; enter the number of teams that will use the application simultaneously for this group.
- "Enforce maximum"; if checked - no more teams can log in than specified at "number of teams".
- "Validity"; select the preferred option.
-
"Up to and including selected date"; a group is available for users and hosts up to and including the selected date (after this date, the group is no longer available).
-
"One time only, up to and including selected date"; a group is only available once for users and hosts up to and including the selected date (after this date, the group is no longer available).
-
Within the admin environment you can still access the groups (e.g. downloading pictures/videos).
- "Date"; select a date of validity.
- "Test group"; if checked - the group will be created as test group.
-
Test groups allow you to test the functionality without being charged (commercial usage is prohibited), therefor the server will not be scaled to support usage with multiple users as test groups simultaneously.
-
The user icon in a test group can be moved on the map by clicking on it and dragging it to simulate movement.
Then click "Save". Now the changes made are saved.
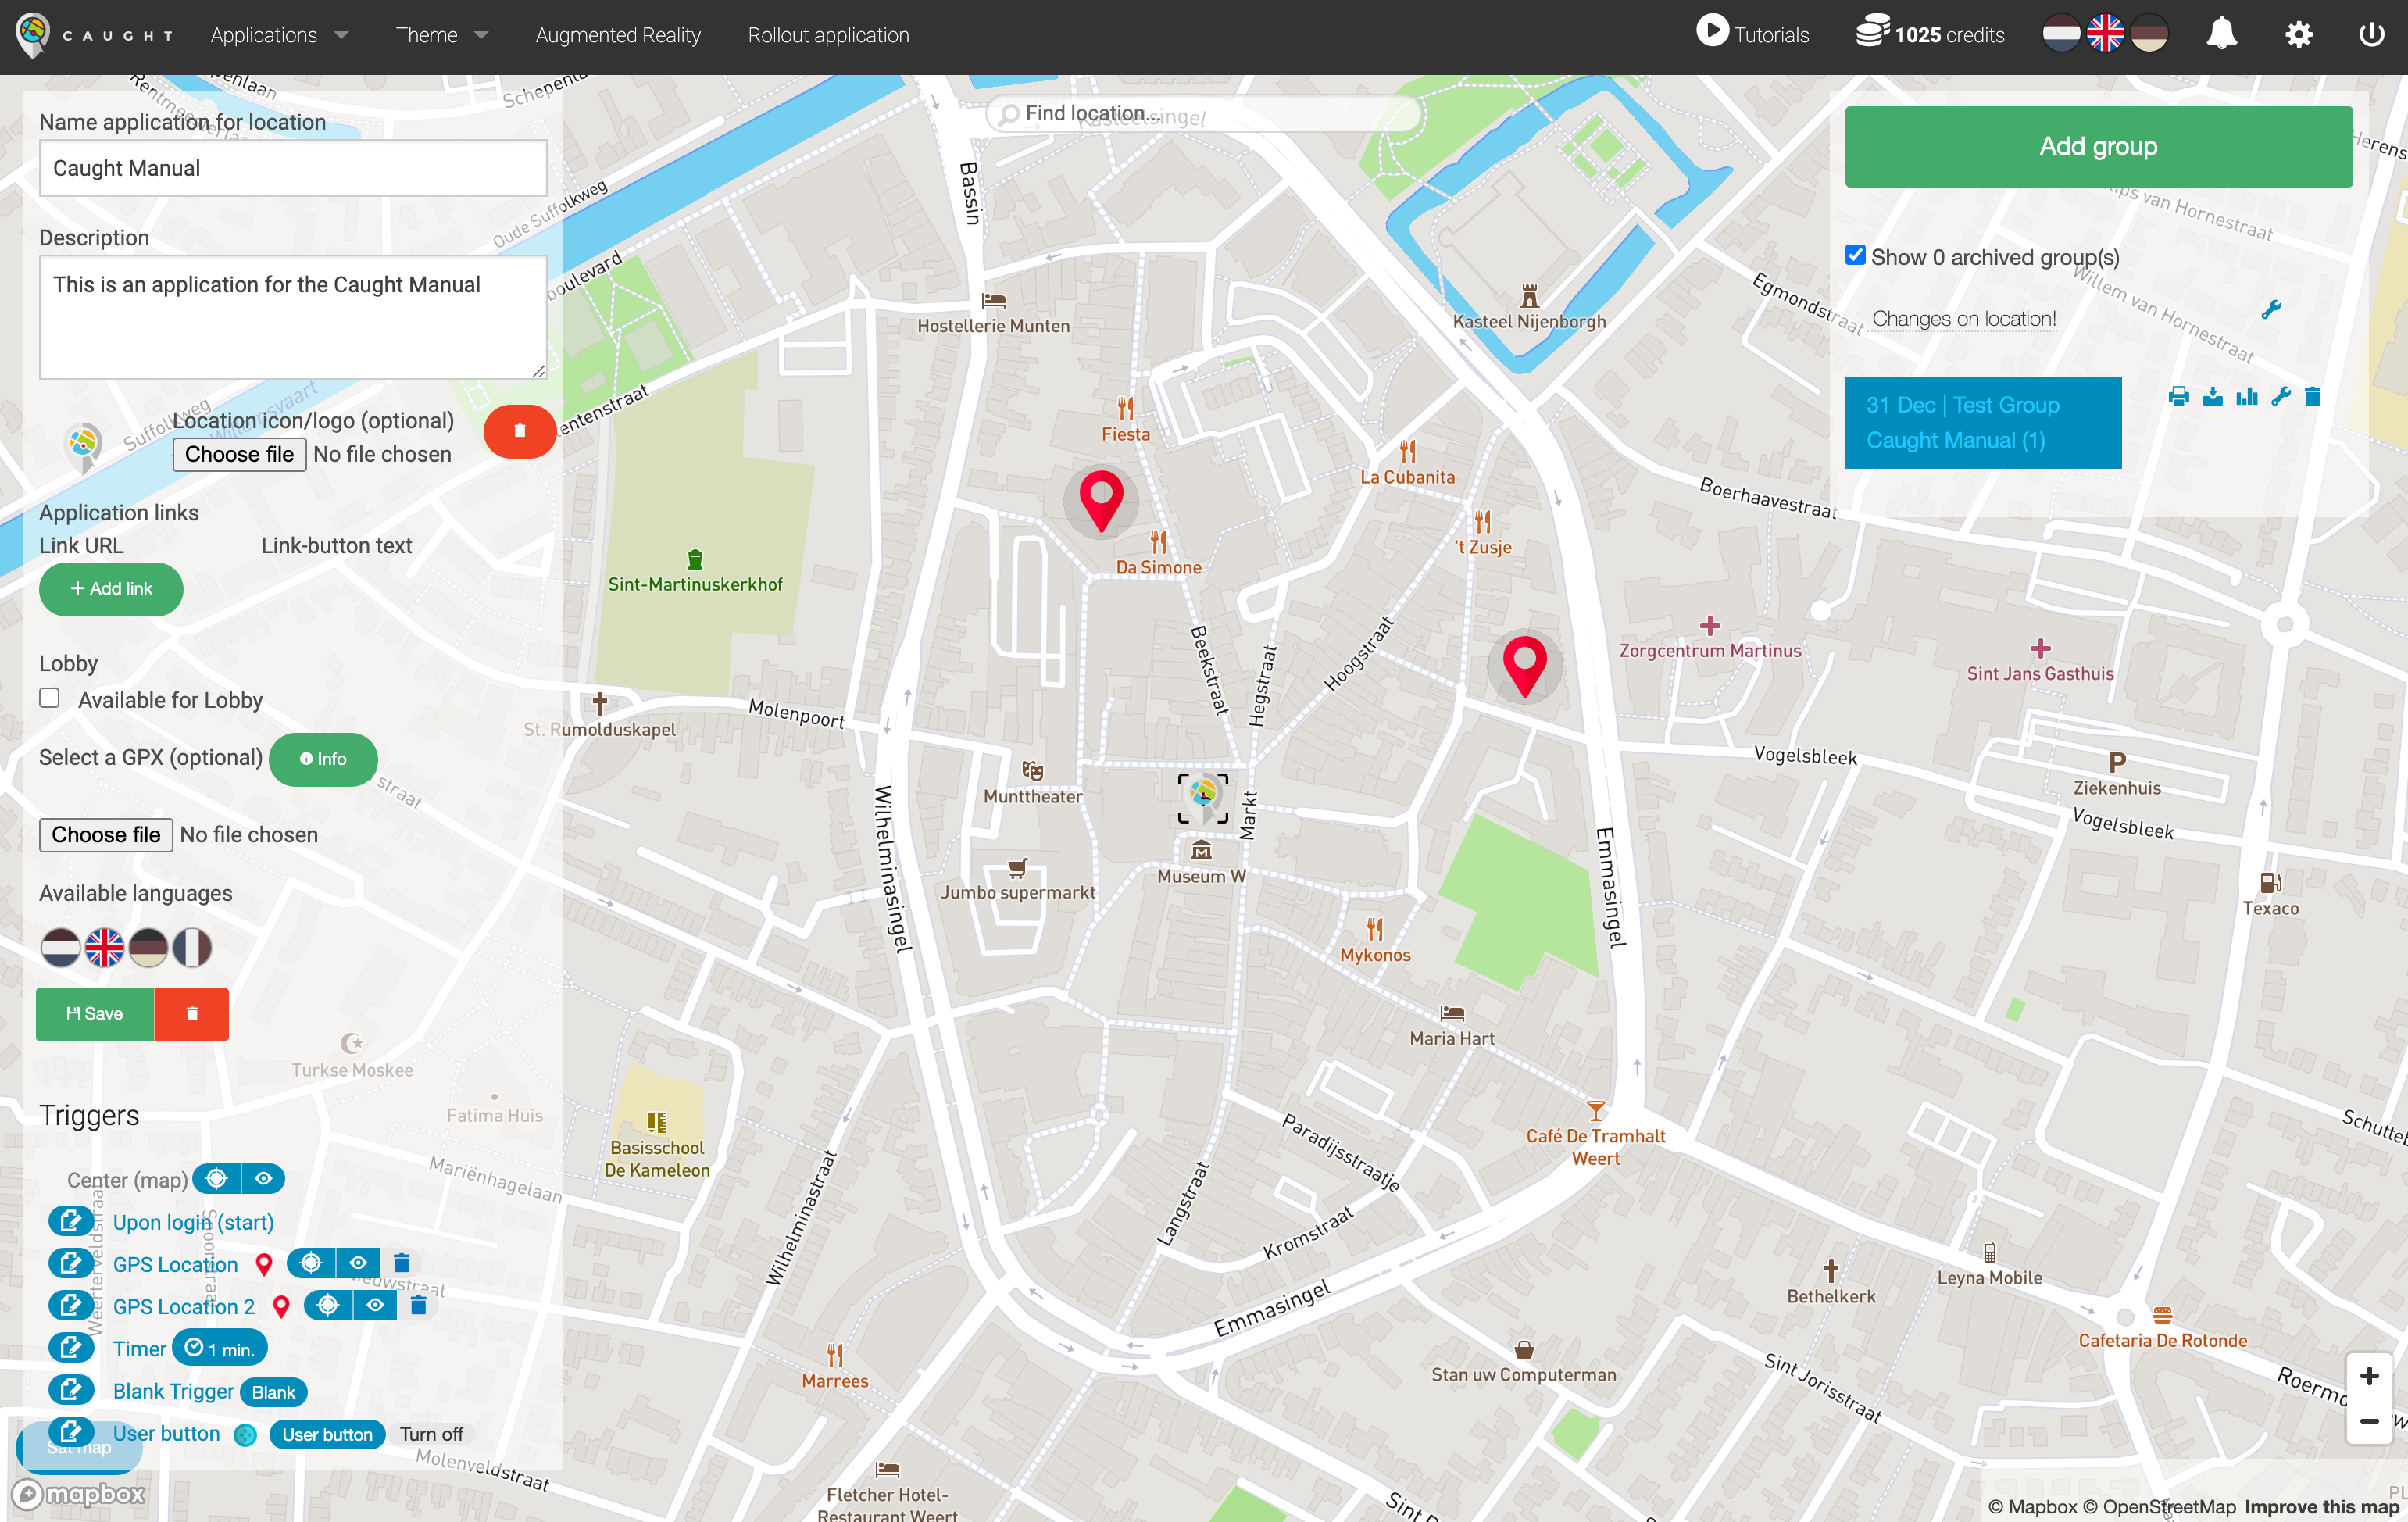
All groups for this location will be displayed in a list on the upper right corner.
Click 'Add group' to create a new group.
 Click the 'wrench' next to 'Changes on location' to start editing content for the location as a whole.
Changes made on the location will apply only to new groups, not to existing ones!
Existing groups remain as they were before the changes at the location level were made.
Click the 'print' icon to print group login details or to see back group information when the group was deleted / archived.
Click the 'download' icon to download pictures / videos made for this group as a zip file.
Click the 'statistics' icon to export all logs to an excel-file.
Click the 'wrench' to start editing content for this specific group.
Click the 'trash bin' icon to delete a group.
Changes made on a specific group will only be applied to that specific group and not to the location as a whole or other groups in the same location.